Design
Understand the rules and the physics before you cut any wood.
Rules that shape the design
Every number in this table limits what you can build. Rule numbers point to the 2027 Boomilever rules so you can check the exact wording.
| Constraint | What it means for your design | Rule |
|---|---|---|
| Wood + adhesive only | Build only from wood and adhesive. No tape, string, metal, paper, plywood, or bamboo. You may glue your own sticks together into laminated parts. Wood may not be painted, soaked, or coated in glue. | 3.b, 7.a to 7.d |
| One piece | No loose or detachable parts. Everything is glued into a single structure. | 3.a |
| Hangs on the bolt | The structure attaches only by resting on the mounting bolt, which sticks out 3.0 cm from the wall. You design the hook. | 3.c, 6.b.v |
| Reach: 40 to 45 cm | The chain centerline must be 40 to 45 cm from the wall, measured horizontally. Shorter reach means smaller forces, so aim just past 40 cm. | 3.e.i |
| Centered: ±2.5 cm | The chain must be within 2.5 cm of the wall's centerline. Build straight and symmetric. | 3.e.ii |
| Contact width: ±4 cm | Only parts inside the two lines 4 cm either side of the bolt may touch the wall. The structure can be wider away from the wall. | 3.f, 6.b.iv |
| Contact depth | Base: touch only above the 20 cm line (or Tier 2). Bonus: touch only above the 15 cm line. Lines are measured down from the bolt's center. | 3.h, 3.i |
| Block above the bolt | Before loading, the bottom of the 5 × 5 cm loading block must sit above the bolt's horizontal centerline. During loading it may sag below. Changed for 2027: in 2026 the limit was the 20 or 15 cm line. | 3.g |
| Supports only the block | Your structure holds the loading block; the block holds the eyebolt, chain, and bucket. Leave a gap for the ¼" eyebolt to pass through. | 3.d, 6.c |
| Weighed to 0.01 g | Every hundredth of a gram counts. Lowest mass is the first tiebreaker. | 4.b.iv, 5.e |
| Estimated load | You submit an estimate of the load you will hold at check-in. Closest estimate is the second tiebreaker. | 4.b.iii, 5.e.ii |
The testing wall
The wall is at least 40 × 30 cm. The bolt hole sits 5 cm below the top edge, centered. Horizontal lines are drawn 10, 15, and 20 cm below the bolt center; vertical lines are 4 cm either side.
The bolt is a ¼-20 connector bolt, 60 mm long, with a 17 mm head, set so there is 3.0 cm between the bolt head and the wall. Your hook must fit over the bolt shank in that gap.
Build a copy of this wall for home testing. Sheet T-1 has the details.
Tension and compression
A boomilever is a triangle. The load pulls the tip down. The tension member runs from the tip back to the bolt and is stretched. The compression member runs from the tip down to the wall and is squeezed. The wall and the bolt push and pull back.
The size of those forces depends on the shape of the triangle. With reach L and wall contact depth d (from the bolt center down to where the compression member presses on the wall):
A long, flat triangle (big L, small d) multiplies the load. Try it.
What to notice
- At the bonus limit, each member carries almost three times the load. The 15 kg of sand becomes about 42 kg pulling on the tension sticks.
- Every centimeter of extra reach adds force. Aim for 40.5 to 41 cm so that small build errors still leave you above 40.
- The contact depth that matters is where the compression member actually bears on the wall. Build the foot so its bearing surface sits as low as the rules allow, with a small safety margin above the line.
- These formulas assume the tip is level with the bolt. Because the loading block must sit above the bolt line, real designs are slightly different, but the trend is the same.
Basswood breaks in tension somewhere around 50 to 70 MPa when the grain is straight. Glue joints and grain runout are usually weaker than the stick itself.
A safety factor between about 1.2 and 1.5 is a reasonable starting target. Below 1, expect a snap. Far above 1.5, you are carrying extra mass. Your test results are what really count.
Why compression members buckle
Pull on a stick and it stays straight until it snaps. Push on a stick and it bends sideways long before the wood itself is crushed. That sideways bending is buckling, and it is the most common way a good boomilever fails. A tall, skinny column buckles easily; a short, thick one doesn't.
Engineers use Euler's formula to predict buckling:
This is the ideal model: a straight stick with perfect ends. Real sticks are a little crooked and glue joints flex, so the real buckling load is usually lower. Use it to compare designs.
Two ideas fall out of that formula, and they drive almost every design choice on the compression side:
- Length is squared. Cut the unbraced length in half and the model predicts four times the buckling load. This is what cross members do, as long as they are stiff and well glued.
- Spread the wood out. Four thin sticks at the corners of a box are far stiffer than the same wood glued into one solid stick. Doubling the box depth makes it about four times stiffer for the same longeron mass.
Three ways a compression body buckles
Global, up or down
The whole body bows in the middle, usually upward. This is the failure in the build tips.
Fix: make the box deeper, add an angled lamination, or add posts or ties to the tension arms near mid-span.
Global, sideways
The body swings out to one side. Narrow bodies and missing diagonals make this worse.
Fix: widen the body (especially near the wall), add X bracing on top and bottom, or splay the foot.
Local, between braces
One longeron kinks between two cross members while the rest of the body stays straight.
Fix: move cross members closer together, or use a thicker or stiffer longeron there.
Body length and the force it must carry come from the force explorer on sheet D-2 (currently –).
Green bars are above the force you need, red bars below it; the black tick on each bar is the compression force you need. Box height and width are outside measurements. This model is a ballpark: it assumes straight sticks, strong joints, and the load shared equally by all four longerons. The wood numbers are typical values, and balsa stiffness varies by more than 2× between sticks of the same grade, so your structure may fail at a lower load. Use it to compare ideas, then let your tests decide.
Design families
There is no single right boomilever. Every design hangs a load from a wall; each one splits the job between tension and compression a little differently.
The photos below are builds from the 2026 season, shown resting on a table. Under the 2026 rules the tip could hang well below the bolt, so many of them have a level compression body and tension arms rising steeply to the hook. The ways they are built (ladders, boxes, tapers, posts, feet) still apply in 2027. Their proportions don't: on a 2027 wall, the tension member runs roughly level from the bolt and the compression member slopes down to the wall.
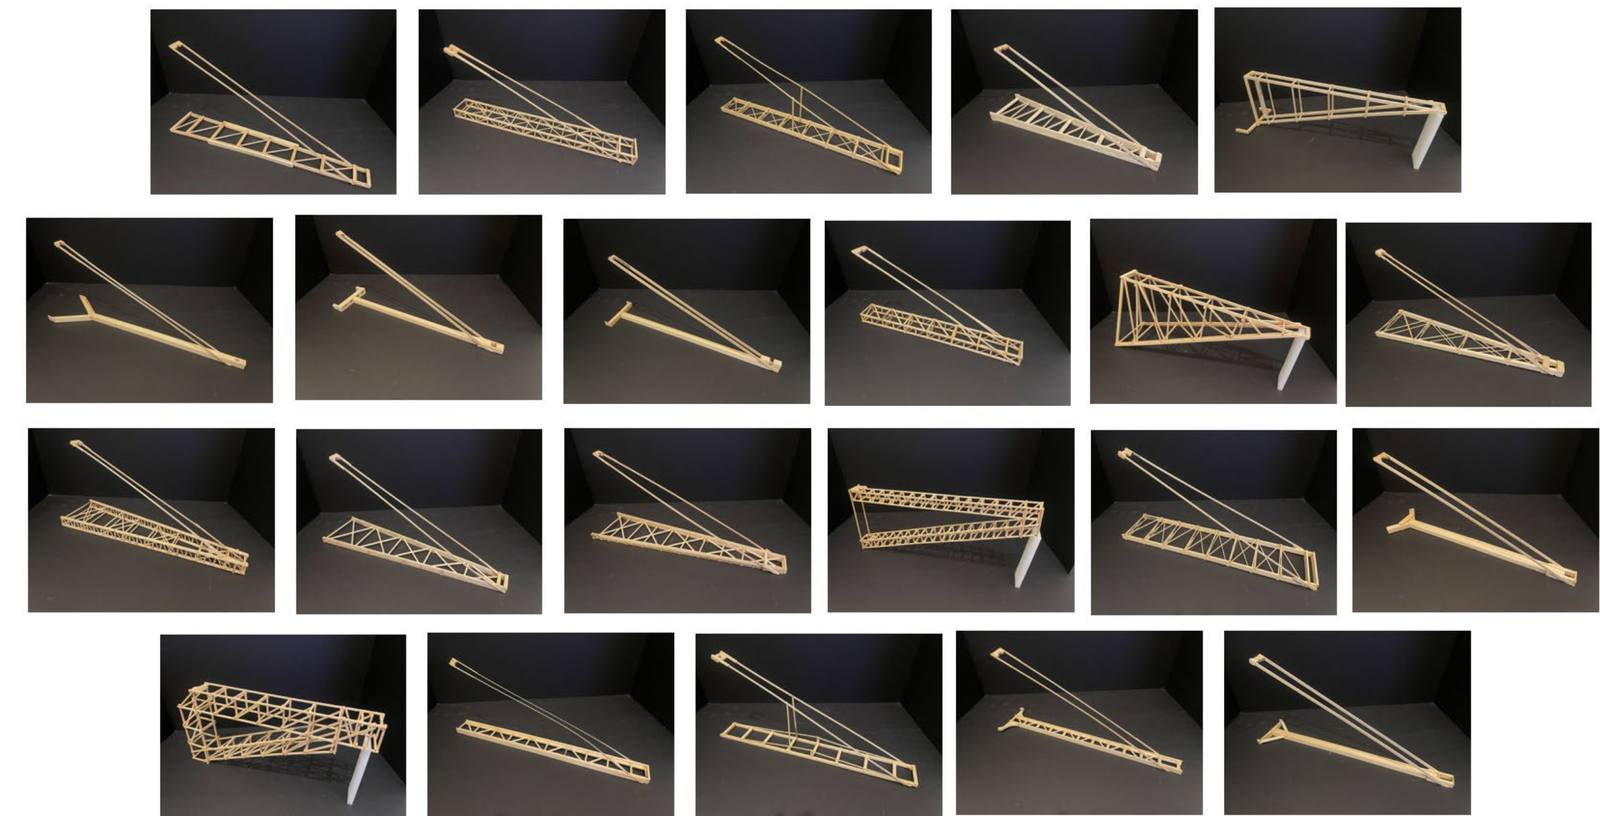
The family sketches below are drawn the 2027 way: side view, mounted on the wall, loading block above the bolt line (dashed).
Questions to ask about any design
- Where does the tension go into the bolt, and how is that joint built?
- How long is the longest unbraced piece in compression?
- What stops the body from swinging sideways? From twisting?
- Where does the compression member bear on the wall, and how wide is the foot? (Max 8 cm.)
- Where does the loading block sit, and is there a clear path for the eyebolt?
Choosing wood
Wood is a natural material. Two balsa sticks of the same size from the same bin can differ in mass by 2× or more, and heavier balsa is usually stiffer and stronger. Choosing sticks on purpose is one of the easiest ways to make a lighter, more predictable boomilever.
| Job | Usual wood | What to choose |
|---|---|---|
| Tension arms | Basswood | Straight grain, no knots or runout. Strong in tension for its size. Pick sticks of matching mass for the left and right arms. |
| Wall joint / hook | Basswood, laminated | Takes the highest concentrated load and the bolt contact. Laminating 2 to 3 layers spreads the load. |
| Compression longerons | Balsa | Medium to heavy, stiff, straight. Match all four within a few percent so the box doesn't bow toward the weak stick. |
| Cross members and diagonals | Light balsa | They carry less load than the main sticks, but they stop buckling and twisting. Go lighter only after a test shows it's safe. |
| High-stress ends | Basswood | At the wall foot and under the loading block, where crushing is a risk. |
Compare sticks by density (mass ÷ volume), not just mass, since sticks are cut to different lengths.
Density is a guide, not proof of the wood type. If a result looks odd, check the wood and measure again.